.png?width=280&name=SameDayShippingGuarantee-New%20(1).png "Same-Day-Shipping-Sprayer-Depot")


 We’ve talked a little bit about roller pump repair in the past and briefly explained some of the things to consider if you think it's time to consider repairing a broken or damaged roller pump. Today we’ll dive into the subject in more detail and share what to do to carefully inspect all parts of the roller pump for wear. From there you’ll be able to easily assess whether a repair kit is in order or, alternatively, if a full replacement pump is on your to-do list. Let’s get started.
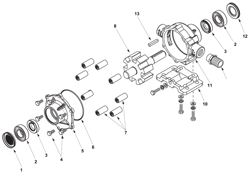
When you’re looking for signs of wear, here are five areas to start. We’ll be using a Hypro roller pump as a point of reference throughout, but the main points apply to any make or model.
Housing Wear: The first place to look for wear is the housing. Make sure it’s in good condition, checking on both the inside diameter and the back face. Check 1/16” from the edge and look for a lip as an indicator of excessive wear.
Cover: Checking the cover might be the first place that you’ve looked for signs of wear. And well you’re not far off. When looking at the cover, keep an eye in the roller area in particular.
Rotor: When you’re looking at the rotor for signs of wear, you should look at its size. An undersized rotor, or one with worn roller slots, is a sign of excessive wear. To determine if it's undersized, you’ll want to measure the thickness of the rotor, which on a Hypro 7500 series roller pump should be 1.4995 at its smallest.
Rollers: Much like the rotor, undersized or swollen rotors in both length and diameter are not good. Measure the thickness and make sure it’s no smaller than 1.4995. Any smaller and it may be worn out and need to be replaced. Oh and make sure you replace rollers as a set, not just one at a time.
Shaft: Check the drive end of the shaft for wear (as well as in the seal area ) where signs of excessive wear include pitting or grooves. If it’s worn or pitted, the shaft needs to be replaced. Otherwise, it won"t seal properly.
After the above parts have been checked and the various points have been considered, decide if the pump is repairable. If it’s just a repair, grab yourself a repair kit and the following tools: socket, hammer, cradle (to support the housing), file and a measuring tool, to name a few. Then follow these steps to disassemble the pump:
- Remove the adapter from the pump shaft.
- File off any burrs on the pump shaft.
- With a screwdriver, pry bearing covers off of the endplate and body.
- Remove the endplate bolts.
- Support the pump at its ports in a support fixture with the endplate down. Place it on a press bed. Center the press on the pump shaft and apply pressure to press the pump apart. Note that the shaft and rotor will remain with the endplate.
- Remove the rollers and endplate o-ring seal.
- To disassemble the rotor from the shaft, place the endplate in the support fixture with the rotor down. Center the 3/8" bolt on the pump shaft and apply pressure to press the shaft out of the bearing.
- With the endplate in the support fixture and the front of the endplate facing down, center the bearing support tool and slowly press the bearing out of the casting. Repeat the procedure to remove the bearing from the pump body.
- Punch the seals out of the endplate and body with screwdriver and hammer. Then discard the seals – seals can’t be removed without damaging them so you’ll need to replace them regardless.
Once the necessary repairs have been made and the pump is clean of debris. Reassemble the pump. Note that when you’re tightening the bolts tighten them in a crisscross pattern. Then check to see if the rotor is centered in the pump case by turning the pump shaft by hand. If the pump turns hard, place a wooden dowel against the end of the shaft, centering it on the shaft not the bearing. Tap lightly with a hammer. Try turning the shaft again and if it turns more easily you should be good. If this doesn’t do the trick, repeat the steps and tap the other end of the shaft. These minor adjustments will ultimately align the shaft, but if that doesn't work, try cleaning the pump - it's possible a piece of debris from a rag or something is caught inside.
Now that your roller pump is back in action, take care to ensure it lasts longer and performs better by taking care of it properly. After each use, make sure that you flush the pump with a neutralizing solution that's meant for the liquid you just pumped. Follow with a clean water rinse. This is especially important for corrosive chemicals. It is good practice to clean the pump after each use to prevent deposits from forming and damaging the pump.
Have any tips or tricks to add? Leave a note in the comments below. We'd love to hear from you.

