.png?width=280&name=SameDayShippingGuarantee-New%20(1).png "Same-Day-Shipping-Sprayer-Depot")


Contributed by Guest Blogger:
Mark Techler, Factory Representative - Hypro & SHURflo Ag and Industrial Pumps and Accessories
1 Comment Click here to read/write comments
Topics: Hypro, Diaphragm pumps, sprayer, Roller Pump, spray tips, spray nozzle, horticulture, Guest blog
Our Repair Technicians are the best! Yes, we are proud of their excellent service and extensive knowledge in all things sprayers. They are quick to diagnose issues and repair them in no time. They work hard five days a week to make sure your downtime is minimal. Usually, repairs are done within the same day unless we need to order parts or if we have a long queue for the day. Even then, most repairs only take 24-48 hours.
If you've visited our website or follow us in social media then you know we have many instructional videos available. For all of our customers who are not local thus unable to stop by for a repair, we thought it would be cool to have short, easy and convenient videos featuring some of the most common repairs that you can do right at home.
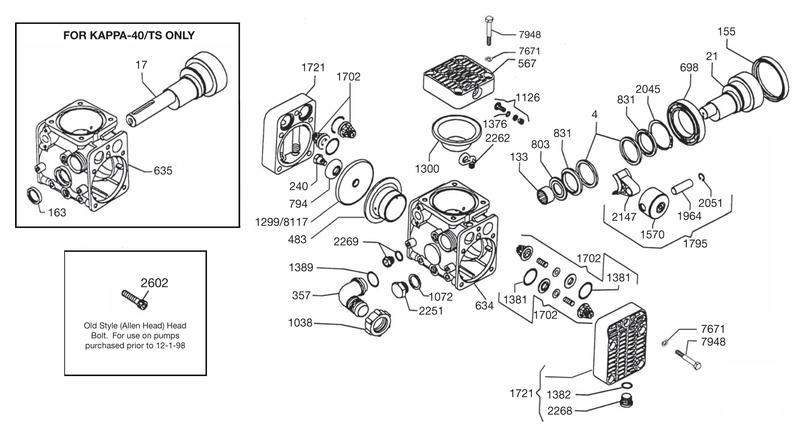
Today we are featuring steps on how to repair a Udor Kappa-40 Diaphragm pump. Watch the video and follow the easy steps outlined below.
For this project you will need the following tools:
- A screwdriver
- Wrench
- Half inch socket
- 11/16" socket
- Diaphragm kit (2 diaphragms, 2 sets of O-rings and an air accumulator diaphragm)
Let's get started! Follow these steps:
- Loosen the bolts in one of the two head assemblies to remove it
- Remove the diaphragm nut and washer using the wrench
- Remove the diaphragm
- Remove the piston sleeve
- Drain the internal oil
- Loosen the bolts on the second head to remove it
- Perform steps 2-5 for the second head
- Clean both sides of the pump with break cleaner
- Place the piston sleeve back in place in one of the two heads
- Place the diaphragm inside. The diaphragm has a beveled side which needs to be facing up
- Use the wrench to tighten the nut and washer back into place
- On each of the two head assemblies remove the inside valve assemble
- Replace the spring, valve seat (beveled side down), and large metal seat
- Replace O-ring with a new one
- The other valve assembly has the exact same parts but reversed (follow steps 13-14)
- Switch to the other head and perform steps 13-15 for this side as well
- Place the head assembly back in place on the side where you replaced the piston sleeve (step 9)
- Tighten bolts in a clockwise pattern to tighten evenly
- Switch to the other head and use non-detergent 40 weight pump oil to fill that open side
- Place piston sleeve back in place
- Clean up any excess oil
- Replace diaphragm, making sure that beveled side is facing up just like in step 13
- Use the wrench to tighten the nut and washer
- Place the head assembly back in place and tighten screws in clockwise pattern to tighten evenly
- There is a clear bolt on the side of the pump and the oil level should be visible right in the center
- Remove the air accumulator head by loosening the bolts
- Once opened, remove the air accumulator diaphragm and replace with new
- Close everything back and tighten for a secure fitting
0 Comments Click here to read/write comments
Topics: Diaphragm pumps, Sprayer Depot, Instructional Video, Udor Pumps, Udor Kappa, pump repair kit, Sprayer Depot Instructional Video, Diaphragm Kit, repair kit
Contributed by Guest Blogger:
Mark Techler, Factory Representative - Hypro & SHURflo Ag and Industrial Pumps and Accessories
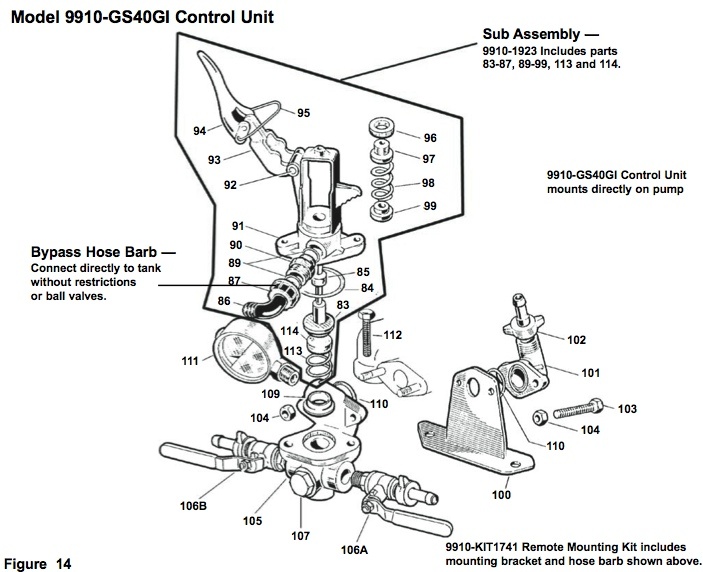
Sprayers with positive displacement pumps need some way to bypass the flow of liquid when the gun or boom is shut off. Let’s compare a typical relief valve, like a TeeJet S6815 series valve, to a commonly used control unit, like Hypro GS40GI, which includes a relief valve and much more.
Read More
0 Comments Click here to read/write comments
Topics: Hypro, Diaphragm pumps, sprayer, spray tips, Guest blog, relief valve, control unit

